The Protocol is the backbone and the ultimate compass of any clinical trial. It serves as a vital bridge connecting your research objectives with stringent regulatory requirements.
However, if the initial design is left with vague objectives, misalignments between statistical and data management plans, or a lack of change control, it will inevitably return as a boomerang of regulatory delays and skyrocketing costs.
Today, we will share a core checklist and real-world case studies from a practical standpoint to drastically minimize protocol design errors and seamlessly integrate regulatory expectations.
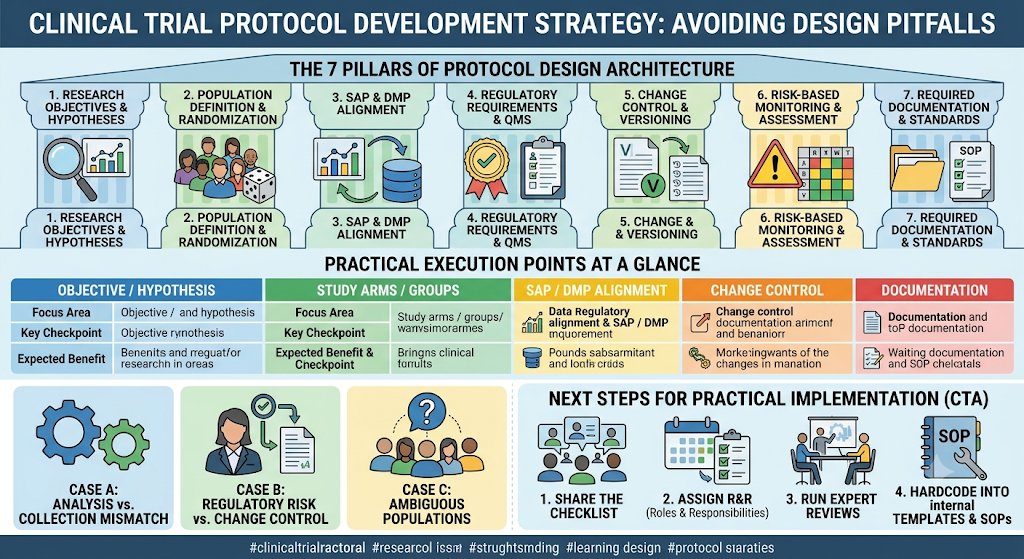
📌 The 7 Pillars of Protocol Design Architecture
Successful clinical trial design starts with filling in the gaps using a robust checklist. Before finalizing your protocol, ensure these seven core elements are thoroughly addressed:
- Clarification of research objectives and hypotheses
- Consistency in population definition, randomization, and control group setup
- Alignment between the Statistical Analysis Plan (SAP) and the Data Management Plan (DMP)
- Integration of regulatory requirements and a Quality Management System (QMS) plan
- Concrete framework for change control and version tracking
- Risk-Based Monitoring (RBM) and risk assessment mechanisms
- Clear definition of required documentation (SOPs, templates, etc.) and documentation standards
💡 Practical Execution Points at a Glance
| Focus Area | Key Checkpoint | ✨ Expected Benefit |
| Objective / Hypothesis | Specificity of measurable hypotheses, explicit trial termination conditions | Ensures consistency in data interpretation; prevents confusion |
| Study Arms / Groups | Sample size justification, randomization methods, control group definitions | Minimizes bias; secures statistical power |
| SAP / DMP Alignment | Mapping analysis scenarios directly to data management procedures | Strengthens the link between regulatory needs and actual data analysis |
| Change Control | Logging reasons for modifications, criteria for re-evaluation/re-submission | Minimizes risks introduced by protocol amendments |
| Documentation | Clear versioning, authorized signatories, complete audit trails | Maximizes credibility and readiness for regulatory reviews |
🔍 Case Studies: Learning from Real-World Blind Spots
Even the most perfect theories can stumble during execution. Let’s look at three common design pitfalls encountered in the field and the lessons we can extract from them.
❌ Case A: Mismatch Between Analysis Planning and Data Collection
- The Problem: The underlying assumptions in the Statistical Analysis Plan (SAP) and Data Management Plan (DMP) contradicted each other. Consequently, the collected data could not be analyzed as intended, resulting in major delays and forcing a complete re-analysis.
- 💡 The Lesson: You must lock in the SAP-DMP mapping early during the draft protocol phase. If a change occurs on one side, it must be immediately synchronized with the other.
❌ Case B: Increased Regulatory Risk due to Absent Change Control
- The Problem: Critical design amendments were made during the trial but skipped the formal documentation and approval process. This led to extensive formal information requests (RFIs) from regulatory auditors, severely stalling the approval process.
- 💡 The Lesson: Even the smallest amendment requires a structured change control process. Document the rationale and secure proper sign-offs proactively.
❌ Case C: Ambiguous Patient Populations
- The Problem: The inclusion and exclusion criteria were vaguely defined, causing mass confusion at clinical sites. Ineligible patients were screened and enrolled, which snowballed into massive re-recruitment and patient-tracking costs.
- 💡 The Lesson: Patient selection criteria represent the very first domino of your study design. They must be stipulated with crystal-clear metrics and unambiguous conditions.
🚀 Next Steps for Practical Implementation (CTA)
Don’t let avoidable mistakes stall your next trial. Put these strategies into action today:
- Share the Checklist: Copy or screenshot this checklist and share it with your team. Set it as the primary agenda for your next protocol kickoff meeting.
- Assign R&R (Roles & Responsibilities): Create a simple action plan assigning an owner and a deadline to each checkpoint item, and integrate this into your initial version control.
- Run Expert Reviews: If any section feels ambiguous after internal review, conduct an internal workshop or leverage external regulatory consulting to tighten quality and compliance before submission.
Editor’s Note A tiny oversight during the protocol design phase multiplies into exponential time and financial losses down the road. By hardcoding this optimization strategy and checklist into your internal templates and SOPs, you will be well-equipped to lead safer, highly efficient clinical trials.
#ProtocolDesign #ClinicalTrials #Checklist #CaseStudy #RegulatoryCompliance #RiskManagement #ClinicalOperations #CRAs #ClinicalData